IAQ Building Education and Assessment Model (IBEAM) - Diagnosing and Solving Problems
- Contrasting Diagnostics in Industrial and Commercial Facilities
- General Diagnostic Process for Commercial Facilities
- Characterizing Problems
- Checking Potential Causes
- Basic Measurement Techniques
Contrasting Diagnostics in Industrial and Commercial Facilities
In industrial environments, worker exposure to specific known sources of industrial contamination must be controlled. The diagnostic process is characterized by measurements of the target contaminants and comparisons of the concentrations to occupational standards of acceptable exposure developed specifically to protect industrial workers.
Occupational standards of acceptable exposure for industrial workers are available. They are designed to protect workers from levels that would cause “material damage of health and functional capacity” and where controls are technically and economically feasible in industry. Two commonly used standards are the:
- Permissible Exposure Limits (PELs) established by the Occupational Safety and Health Administration (OSHA).
- Threshold Limit Values (TLVs) established by the American Conference of Industrial Hygienists (ACGIH).
Use of occupational standards are NOT appropriate for use in commercial facilities.
Commercial environments are characterized by hundreds of sources producing multiple contaminants at much lower than industrial levels. Indeed, exceeding occupational standards in a non-industrial environment would indicate very serious indoor air quality concerns. In commercial environments, indoor air quality depends on how these sources and contaminants interact with air flow patterns, heat and humidity factors, and occupant patterns in time and space within the building. Looking for patterns and relationships in source emissions, occupancy, activities, ventilation and direction of airflow is most productive in these cases.
Measurements are designed to characterize the amount of outdoor air that is delivered to occupants, comfort indicators, the performance of the HVAC system, pressure relationships, and air flow patterns that could transport contaminants from potential sources to the occupied areas of the building.
- Measurements of specific contaminants are very seldom warranted.
General Diagnostic Process for Commercial Facilities
Generally, there are three steps in a diagnostic process.
- Determine if this is an emergency. If it is, take actions immediately to protect occupants and property. Determine is the problem is building related and, if it is, continue with steps 2 and 3.
- Proceed through a deliberate process of characterizing problem finding clues as to causes, and communicating with occupants and operators.
- Check specific causes until the problem is solved.
Identifying an Emergency
Emergencies are situations in which a limited time is available to avert or deal with serious health problems or property damage. Examples include:
- Hazardous material spills
- Flooding on porous materials
- Gray water (e.g., sewer) spills
- Gas leak
- Sudden onset of headaches, dizziness, drowsiness, nausea and/or combustion odors (could be carbon monoxide poisoning)
- Widespread breathing difficulties, chest tightness or respiratory irritation (potential serious infectious or allergenic agent)
- Diagnosed Legionnaires disease or tuberculosis
Taking Action in an Emergency
The object of initial action in emergency situations is to deal with the situation creating the hazardous conditions first, including getting people out of harm’s way.
- Immediately notify and seek assistance from an appropriate authority (e.g. health department, hazardous waste office, fire department, gas utility etc.)
- Evacuate the area if needed
- Obtain medical assistance
- Ventilate affected areas with large quantities of outdoor air using temporary fans if necessary
- Inform building occupants of problem, what is being done and maintain clear communications
- Begin remediation procedures
Characterizing Problems
Purpose
The processes in this phase are designed to diagnose and solve typical indoor air quality problems that are not emergencies. The information provided is designed to help the user develop a diagnostic way of thinking about indoor air quality problems. IBEAM also provides a set of forms to aid in diagnosing and solving problems.
Iterative Diagnostic Process
An IAQ investigation is like detective work - defining the problem, looking for clues, and finding a solution through an iterative process of narrowing the possible causes, and developing and testing hypotheses.
- See Iterative Diganostic Process flow Chart for example.
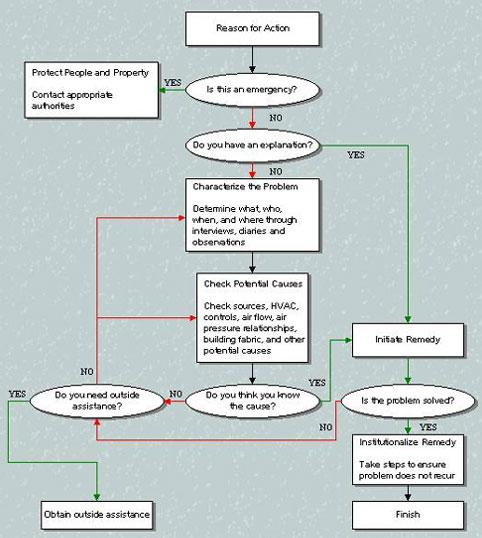
Clues may be found in basic information about the problem. Seeking the right information from occupants, examining building components with an educated eye, and making some simple diagnostic measurements can probably solve most problems. Determine:
- What are the symptoms? What are the symptoms or substance of the complaint? Answers can give clues as to potential type of cause(s) (e.g. type of contamination, inadequate outdoor air, temperature/humidity issue, etc.).
- Where is the problem? Local or widespread, in one HVAC zone or more, on one side of the building or all sides, one floor/room or throughout the building? Answers can give clues as to the nature of the cause(s) such as a local source or local HVAC component problem, or a source that is widespread throughout the building, a central HVAC problem, a problem common to all air handlers or just one.
- When does it occur? Times, time pattern, time in relation to individual activities, time in relationship to other activities in the building, time in relation to occupancy in building? Answers can give clues as to whether it is related to the building or elsewhere, and what activities may be associated with the cause(s), whether the cause(s) are occupant related or building related.
- Who is the problem experienced by? An individual or several, just in person(s) with preexisting sensitivities or across the board? Answers provide clues as to whether or not the individual(s) may have special needs that, if accommodated, could solve the problem.
- Use I-Beam's Occupant Complaint Record forms to help collect this information.
What are the Symptoms?
Some symptoms or conditions suggest that certain causes are more likely than others are. Is the cause of the problem most likely to be a chemical source, a biological source, a lack of outdoor air, a thermal comfort problem or not related to the building? In conjunction with the other information you obtain, use the table below to help narrow your first line of investigation. If the primary choice is not fruitful, go to the secondary choices.
| Symptom/Condition | Potential Cause | Comment | |
|---|---|---|---|
| Primary | Secondary | ||
| Cough, congestion, chest tightness, shortness of breath, fever, chills | Biological | Chemical/particle |
|
| Diagnosed infection or allergic disease | Biological | (none) |
|
| Swelling, itching, skin rash |
|
|
|
| Sinus headache | Biological (allergen), e.g. pollen, mold | Chemical particle |
|
| Wheezing, asthma | Asthma triggers
|
(none) |
See other responses associated with biological pollutants |
|
|
|
|
| Stuffy air |
|
Insufficient air movement |
|
| Too hot |
|
Insufficient air movement |
|
| Dry air |
|
Lack of outdoor air |
|
| Odors | |||
|
|
|
|
Where Symptoms Occur
Are symptoms local to a given room, floor, air handling zone, side of the building, or are they widespread or scattered throughout the building? The possibilities are numerous. The examples below will help guide the user into the kind of investigative thought process (detective work) that can help find the cause(s) of the problem.
| Symptoms | Potential Source Examples | Potential HVAC Problem Examples | Potential Pathway Examples |
|---|---|---|---|
| Local |
|
|
|
| Interior zone |
|
|
(none) |
| Widespread |
|
|
|
When Problems Occur
Looking for patterns in time, and then relating these patterns to various occupant or building activities, or to your knowledge of HVAC operations, can give clues as to the potential cause(s). The table below provides some examples of patterns and possible causes. It is designed to help the user understand how knowledge of the time pattern can help form a hypothesis of the cause. These are only examples.
Identifying Diagnostic Patterns
| Pattern of Occurrence | Possible Causes |
|---|---|
| Mornings, (may be more severe on Monday morning), then dissipates as day/week progresses |
|
| Latter part of the week |
|
| Recurrent on a particular schedule |
|
| Hot weather |
|
| Mild temperatures |
|
| Cool weather |
|
| Does not go away when leave the building |
|
Who Experiences the Problem?
If it is just one individual, it may be that this individual is particularly sensitive to a contaminating agent in the building, or the problem may be local to their workspace. If all the individuals affected have a common preexisting condition such as a particular allergy, knowledge of their sensitivity may help find the cause(s) and may lead either to elimination of the causal agent or work arrangements that will minimize their exposure.
Checking Potential Causes
Having developed some hypotheses about potential causes from examining clues suggested by the "what," "where," "when," and "who" of the problem, do some simple checks to see if the problem is obvious. Examples below suggest some things to check in looking at common sources or causes.
Checking Potential Causes
| Potential Cause | Things to Check |
|---|---|
| Mold |
Excess moisture or humidity can foster mold/fungi, dust mites and some bacteria. |
| Particles |
Particles can themselves be harmful, and may contain chemicals that are harmful. Source control, good housekeeping and filtration can be effective strategies |
| Housekeeping Sources |
Housekeeping is important to good indoor air quality, but it also contains the potential for creating indoor air quality problems. |
| Building Sources |
Source control for major building sources, protocols during remodeling and renovation, and adequate outdoor air strategies for general sources are important dimensions of controlling building source contamination. |
| Outdoor sources |
Important outdoor sources can be building related, traffic related, land use related or vegetation related. Source type, source location and wind direction are important considerations. |
| Sewer gas or similar odor |
Soil gases, including radon, can enter the building through the basement foundation, and odors from drain traps and sanitary vents should be controlled. |
| Outdoor air supply |
Outdoor air dilutes contaminants from all sources. The ventilation system should provide sufficient outdoor air to all occupied spaces during all operating modes. |
| Air Handling Unit | Also see Outdoor Air Supply.
The air handler is at the heart of the ventilation system. All parts must be functioning well under all operating modes, clean and protected from microbial growth. |
| Local Exhaust |
Local exhaust can be an effective means of controlling stationary local sources, but they must be properly located and operational. |
Basic Measurement Techniques
Most IAQ problems can be effectively diagnosed with educated observations, an awareness of odors, a sense of temperature and relative humidity, and a smoke pencil to observe the existence of and direction of air flows. It is often useful to also measure thermal comfort parameters using various instruments to measure temperature and relative humidity.
Occasionally, the diagnostician will want to measure airflow into, through, or out of ducts/vents, or calculate the percent of outdoor air in the supply air stream. Some diagnosticians may also find it useful to track carbon dioxide levels in occupied spaces over the course of the occupancy period, or compare carbon dioxide levels in the complaint area with levels in non-complaint areas.
The measurement techniques described here are simple and comparatively easy to perform. More complex measurement methods and those involving measurement of specific contaminants are usually not needed, and would normally require outside expertise. Diligently follow manufacturer's instructions on all measurement instructions.
Observing or Measuring Airflow
Using Smoke Tubes
Smoke tubes or smoke guns can provide a quick visualization of the path of the airstream and thus help identify pressure differentials. By dispensing a series of small “puffs” or "dribbles" the smoke can provide more information that a single large “cloud.” In occupied areas, if the smoke is dispersed in several seconds, this suggests good air circulation. Smoke tubes have a variety of uses and should be a staple of the building diagnostician. Use smoke tubes:
- Near supply air outlets - the dispersal pattern provides information about the velocity and direction of the supply air.
- Near exhaust vents to make sure the exhaust is drawing air out of the room.
- Near combustion chamber of combustion appliances to insure that there is no backdraft of flue gases.
- Turn the appliance on.
- Close all doors or other openings that might possibly be closed in normal operating conditions, and turn on all exhaust fans or other equipment (e.g., clothes dryer) that may exhaust air from the room.
- Release puffs of smoke next to the combustion chamber and around the flue fittings (where flue gases might leak into the room) to detect any air movement from the flue or combustion chamber into the room.
- If any flue gas leakage is occurring, turn off the appliance, open windows and doors, and exit the room. This is a potentially life threatening hazard.
- At drain trap openings make sure no air is flowing up from the trap.
- At duct seams to check for leakage.
- At the entrance to an exhausted room to insure the room is under negative pressure relative to the occupied spaces.
- At the entrance to a clean room to insure room is under positive pressure.
More generally, identify spaces that are positive or negative relative to other spaces to determine if this may be causing pollutants or moisture to travel in undesirable paths.
Measuring Outdoor Air Flow
The quantity of outdoor air supplied to a building can be ascertained using a flow hood or air velocity measurements. To check that outside air requirements are being met under all operating conditions, take measurements at minimum airflow.
- If an economizer is operating, turn the economizer off, or set the economizer shutoff temperature to the lowest setting.
- Since airflow varies during the day and over the seasons in VAV systems, VAV system controls should be made to operate at minimum flow conditions.
Measuring Air Flow with a Flow Hood (Preferred)
Flow hoods are designed to measure airflow through an opening (e.g., at supply air diffusers or return air grills, outdoor air intake) by placing the face of the flow hood over the opening and reading the computed airflow volume. The flow hood must completely cover the opening. If the opening is larger than the flow hood, the user can obtain a reasonable estimate by following manufacturer’s recommendations. Flow hoods will show the airflow in an easier, quicker, and more consistent manner than using a series of pitot tube or rotating-vane anemometer readings.
Measuring Air Flow with a Velocity Meter (Less Preferred)
Velocity meters (anemometer of pitot tube) are less expensive than flow hoods, but their accuracy is more problematic and they require greater attention to detail. An anemometer or Pitot tube can be used to measure the velocity of air passing over a point. To accurately represent the velocity through a duct or opening, multiple measurements must be taken. It is extremely important to follow measurement instructions supplied with the equipment to obtain an accurate reading. Airflow through the duct or opening is then measured by multiplying the area of the opening (e.g., square feet) by the average velocity of the air (e.g., feet per minute) to obtain airflow (cubic feet per minute).
Airflow = Free Open Area X Average Velocity
(ft3/m or m3/m) (ft2 or m2) (ft/min or m/min)
Calculating the Percent of Outdoor Air Using Carbon Dioxide (CO2) Measurements (Not Preferred)
As a last resort, if outdoor air cannot be measured directly, one can measure the supply airflow and calculate the percentage of outdoor air using CO2 measurements.
- Measure the total supply airflow using a flow hood or velocity meter.
- In quick succession, measure carbon dioxide in the supply air, the return air, and outdoor air (do not use calorimetric tubes for these measurements). An average of more than one measurement in each air stream is advisable to obtain accurate estimates.
- Calculate the percent outdoor air as follows:
{CO2 (return) - CO2 (supply)} X 100
{CO2 (return)-CO2 (outside)} =% outdoor air
Outdoor air supply=(Supply airflow) X (% outdoor air)
Measurement of supply and return are best accomplished in an indoor space serviced by an AHU of interest. Outdoor air should be measured at the outdoor air intake of the AHU. Percent outdoor air is the same throughout the supply air stream of the AHU.
Note: It may be tempting to use temperature rather than CO2 to measure percent outdoor air. This is not advisable because as the three airstreams approach each other, varying temperatures affect accuracy and the calculated result can deteriorate very significantly. For the same reason, the difference in CO2 measurements in each air stream should be at least 200 PPM to insure an acceptable level of accuracy for this method.
Measurement of Thermal Comfort
Generally, independent measurements of temperature and relative humidity will be sufficient. However, some instruments will integrate these and other measurements and provide a read out of thermal comfort consistent with ASHRAE Standard 55-1992.
Temperature and Humidity
For temperature and humidity measurements, instruments can be a simple thermometer and humidity gauge, a sling psychrometer, or an electronic thermo hygrometer. Accuracy to within + or – 1o F and + or – 5% RH is the objective of thermal comfort measurements. Readings should be made 3-6 feet off the floor, and at floor level. Persons suffering from cold feet may report that the room is "too cold."
Be sure that the meter is located away from direct sunlight or near a supply air outlet, or other heating/cooling sources. Refer to the manufacturer recommendations for the time needed to stabilize the reading, and maintain the frequency of calibration.
Acceptable Values
Direct reading instruments are readily available. Readings within acceptable ranges for thermal comfort.
Alternatively, a thermal comfort meter can be used. Such meters integrate several thermal comfort parameters and will provide a direct indication as to whether thermal comfort is in the acceptable range according to ASHRAE Standard 55-1992.
Measurement of Light
Measurements should be to ascertain that lighting conditions are adequate for the space. Use of a light meter to measure foot-candles (FC) should be conducted at the working surface in a horizontal plane 30 inches above the floor. Since the objective is to measure the task illuminant, daylight should be excluded. Thus, in an occupied area with windows, readings should be taken with the full use of interior shading (blinds or draperies) to reduce direct solar gain. When measurements are taken, the reflections from other strong light sources should be minimized. Light meters are generally sensitive to ambient temperatures, and should be only operated according the temperature range recommended by the manufacturer. Calibration is as important for light meters as it is for temperature and humidity measuring instruments.
Acceptable Values
Minimum foot-candle (FC) levels measured at the working surface:
- Ambient lighting for PC use: 20 FC
- Visual tasks of high contrast or large size office: 20 FC
- Visual tasks of medium contrast or small size: 50 FC
- Visual tasks of low contrast or very small size: 100 FC
- Hallways and stairwells measured at floor level: 5 FC
- Public spaces with dark surroundings (sidewalks, garages), measured at the floor: 2 FC
Measuring and Interpreting Carbon Dioxide (CO2)
CO2Measuring Instruments
Sorbent tubes are readily available for measuring CO2 and they are inexpensive. However, with accuracy of only + 25%, sorbent tubes are not of much value for indoor air quality diagnostics. Though more expensive, instruments using infrared spectrometry with digital read-outs are more accurate and appropriate.
CO2Value Indicators
The exhaled breath of occupants is the main source of carbon dioxide (CO2) in buildings. Because the concentration of CO2 is highly correlated with levels of human bioeffluents (body odor), CO2measurements are often used to indicate whether the outdoor air ventilation rate in the building is sufficient to handle the bioeffluents load.
ASHRAE ventilation standards of 15-20 cfm of outdoor air per occupant are designed to dilute human bioeffluents odor to an acceptable level. In general, 15 cfm per occupant will keep indoor minus outdoor CO2levels below 700 PPM, while 20 cfm will keep indoor minus outdoor CO2 levels below 500 PPM. (This corresponds to indoor values of 1000 PPM and 800 PPM when outdoor values are 300 PPM, which is assumed by ASHRAE.)
Interpreting CO2 Measurements Above Threshold Values
Indoor CO2 should be measured at peak values. Peaks usually occur around 11am and 3pm in a typical office environment. However, if measurements in the occupied space are ever above 1000 PPM:
- Check for improperly vented combustion appliances, which could also be producing carbon monoxide.
- Check the CO2levels outside; and calculate the indoor-outdoor values and compare with the above mentioned thresholds for 15 and 20 cfm per occupant.
If neither of these conditions can explain why the CO2 levels are above 1000 PPM, it is a valid presumption that the outdoor air ventilation rate is too low.
Interpreting CO2 Below Threshold Values
If CO2 levels are below the identified guidelines, this does not mean that the ventilation rate or that indoor air quality is satisfactory. CO2 measurements below the designated threshold levels are not an indicator that either IAQ or outdoor air ventilation rates are satisfactory.
As a general measure of indoor air quality, CO2 measurements do not account for non-occupant related contaminants, which can dominate the indoor environment. And as an indicator of the outdoor air ventilation rate, the use of CO2measurements will almost always tend to overestimate the true outdoor air ventilation rate, often by as much as 100% to 200%.
This is because the threshold values are based on the assumption that CO2has risen to its theoretical steady state condition. As people occupy the building, when occupancy stabilizes, and when ventilation rates remain constant, CO2levels will rise and eventually reach steady state condition, and go no higher. The steady state value will be greater with higher occupant densities and lower outdoor air ventilation rates.
Unfortunately, it is extremely unlikely that steady state will have been reached.
- Under a typical outdoor air exchange rate of 0.5 air changes per hour, it would take 6 hours to achieve 95% of steady state conditions.
- But constant full occupancy in a building is seldom longer than 3 hours in the morning or 3 hours in the afternoon.
- Thus, measuring CO2prior to steady state will always underestimate the true ventilation rate.
The extent of overestimation increases as occupant density decreases, and as the outdoor air ventilation rate decreases. In the majority of circumstances, CO2 levels in occupied spaces will not achieve 1,000 PPM even when outdoor air ventilation rates are unacceptably low. The matter is further complicated by the fact that outdoor air ventilation rates are often not steady in VAV systems.
Observing Changes to CO2 Values Over Time
Real-time measurements of CO2with data-logging equipment can be also be used to see how CO2 values rise and fall in an occupied space during the day, reflecting the pattern of changing occupancy, or changing outdoor air ventilation rates. This can provide clues as to what is happening in the building and this information can help in the diagnostic process.
Comparing CO2 Values of Different Spaces in the Same Building
The investigator may wish to compare CO2 values in the complaint area with values in other parts of the building. CO2values in the complaint area higher than values in non-complaint areas suggest that outdoor air ventilation rates in the complaint area may be causing the problem.
Measuring Contaminants
Most often IAQ problems can be solved without measuring specific contaminants. Measurements are sometimes helpful:
- to test for clearly identified sources and clearly identified target contaminants
- to measure specific contaminants, such as radon, that have no acute affects but which could cause serious long term illness
- to test for mitigation effectiveness in controlling a source
- to compare with levels found in non-complaint buildings
- to insure the containment of a work area/construction area in an occupied building
- to document for liability or other legal or administrative reasons. When measurements are taken, qualified, experienced persons should take them and adhere to protocols and quality assurance procedures.