Phasing Out of Mercury Thermometers Used in Industrial and Laboratory Settings
Overview
Mercury use in products can lead to releases to the environment through the manufacturing of the products; via spills and breakage; and during the recycling, collection and disposal of mercury-containing products.
As part of a broader initiative to reduce the use of mercury in products, EPA is working with stakeholders to reduce the use of mercury-containing non-fever thermometers in industrial and commercial settings. Measurement and control devices, including glass non-fever thermometers, found in industrial and laboratory settings represent a major use category for mercury-containing products, but in many cases effective non-mercury alternative products exist.
EPA is examining ways to transition to mercury-free alternatives both within EPA and outside of the Agency. The National Institute of Standards and Technology (NIST), which is working with EPA on this effort, announced on February 2, 2011 that it will no longer calibrate mercury-in-glass thermometers for traceability purposes beginning on March 1, 2011.
In January 2012, EPA issued a final rule incorporating updated ASTM International (ASTM) standards into EPA regulations (PDF) (11 pp, 204K, About PDF) These changes provide flexibility to use alternatives to mercury-containing thermometers. The rule applies to certain regulations pertaining to:
- petroleum refining,
- power generation, and
- polychlorinated biphenyl (PCB) waste disposal.
Questions and Answers
Includes these categories of questions and answers:
- General questions and answers
- Barriers to replacement of mercury thermometers
- Disposal of industrial mercury thermometers
- EPA's efforts
General Questions and Answers
Why are mercury thermometers being replaced?
Mercury is well documented as a toxic, environmentally-persistent substance. Several states prohibit the sale of mercury-containing thermometers.
Will the replacement of mercury thermometers be problematic?
For most applications, alternatives to mercury-containing thermometers are available. However, there are certain applications where the use of alternatives to mercury-containing thermometers is more difficult, such as the use of thermometers in high temperature devices such as autoclaves (where alternatives to mercury are not commonly used).
The following document provides a compilation of guidance on the use of alternatives to mercury-containing thermometers.
What types of non-mercury-containing thermometers are currently available?
There are several types of non-mercury-containing thermometers, including both liquid-in-glass and electronic digital thermometers. An example of an electronic digital thermometer is the platinum resistance thermometer. Others include the thermistor and the thermocouple. Non-mercury organic-liquid-filled-glass thermometers are also a replacement for mercury thermometers. Learn more about these thermometers on the Selecting Alternatives tab.
Are non-mercury-containing thermometers as accurate as mercury-containing thermometers?
The non-mercury platinum resistance thermometer is as accurate as mercury-containing thermometers through a wide temperature range. Non-mercury thermistors are accurate but have a limited temperature range. Non-mercury thermocouples are not as accurate as resistance thermometers or thermistors but are widely used because of their durability. Non-mercury liquid-in-glass thermometers are not as accurate and are typically used when applications call for modest uncertainty requirements.
Are non-mercury-containing thermometers as durable as mercury-containing thermometers?
Like a mercury-containing thermometer, the platinum resistance thermometer is sensitive to mechanical shock. Thermistors are less sensitive and thermocouples are very durable. Non-mercury liquid-in-glass thermometers are as durable as mercury liquid-in-glass thermometers.
Are alternative thermometers more expensive than mercury-containing thermometers?
Electronic thermometers are typically more expensive than mercury-containing thermometers. However, using non-mercury-containing thermometers avoids the potential cost of mercury spill clean-up and disposal.
Are non-mercury-containing thermometers National Institute of Standards and Technology (NIST) traceable?
Yes, if:
- An unbroken chain of measurements back to NIST standards is maintained; and
- Each step of the chain has known and documented uncertainties; and
- There is a system to ensure that the thermometers and other equipment used remains accurate between calibrations.
Read more on the Traceability tab.
Barriers to Replacement of Mercury Thermometers
Are there federal and state regulations which require the use of mercury thermometers?
Yes, some federal and state regulations contain requirements to use mercury thermometers either directly or through citations of standards and methods from organizations such as ASTM International and the American Petroleum Institute (API).
With regulations requiring the use of mercury thermometers, how will the industrial and commercial community be able to reduce the use of mercury thermometers?
EPA is taking steps to revise its regulations to allow non-mercury alternative thermometers. In addition, EPA is working with ASTM International and the API to revise their standards to include flexibility allowing non-mercury alternatives.
Is there a technical basis for requiring the use of mercury thermometers?
No. The National Institute of Standards and Technology (NIST) has concluded that there are no fundamental barriers to the replacement of mercury thermometers. NIST and EPA are collaborating to resolve difficulties in using alternative thermometers in certain elevated temperature applications, such as autoclave operations and asphalt processing.
Disposal of Industrial Mercury Thermometers
How and where do I dispose of an industrial mercury-containing thermometer?
For industrial thermometers, you may:
- Ship them through a hazardous waste transporter to a mercury recycling facility,
- Directly ship them as “universal waste” to a mercury recycling facility, or
- Small businesses may be able to dispose of them at a local collection event, collection facility, or destination facilities for “universal waste.”
Contact your state hazardous waste authority for information on state regulations that may apply to you, as these regulations vary by state (including the definition of universal waste). State hazardous waste authorities can also help you locate a mercury-containing device recycling facility. You may also locate a mercury-containing device recycling facility online that is nearest you by searching Earth911.com Exit.
If a thermometer breaks, extra steps are needed to avoid harmful exposure to mercury. Read more about what to do if a mercury thermometer breaks.
EPA’s Efforts
What is EPA doing to phase out mercury non-fever thermometers?
-
Eliminating Mercury in EPA Labs. EPA has numerous laboratories throughout the United States and contracts with many more. EPA is working to reduce overall use of hazardous chemicals, including mercury, in accordance with Executive Order 13148, Greening the Government Through Leadership in Environmental Management (PDF)(14 pp, 257 KB, About PDF) (April 21, 2000). EPA issued a memorandum on September 30, 2008, calling for the phase-out of all mercury-containing non-fever thermometers used in EPA laboratories.
-
In addition, EPA’s Office of Research and Development issued an internal directive to eventually eliminate all mercury thermometers within the office. Since initiating the program, EPA labs removed and safely disposed of approximately 2,000 mercury-containing non-fever thermometers. EPA has also developed a Guide for Federal Agencies on Replacing Mercury-Containing Non-Fever Thermometers for other federal agencies to use when developing their own phase-out programs.
-
Removing Barriers in EPA Regulations and Test Methods. After assessing its own regulations and test methods to locate references to mercury thermometers, EPA in January 2012 updated such references to allow the use of alternatives to mercury-containing thermometers (PDF)(11 pp, 204 K, about PDF). The final rule incorporated ASTM Standards D5865-10, D445-09, and D93-09 in certain regulations that cover petroleum refining, power generation and polychlorinated biphenyl (PCB) waste disposal. The proposal for this rule was issued in January 2011 (PDF)(11 pp, 178K, about PDF).
-
Revising ASTM Standards. EPA is helping ASTM to identify industrial standards and test methods that require the use of glass non-fever thermometers containing mercury to determine whether the use of alternatives is feasible. Read more about ASTM's standards review effort.
-
To date, multiple ASTM standards have been updated to approve the use of mercury-free alternatives for temperature measurement. View a list of the updated ASTM standards.
Selecting Alternatives
Mercury-filled liquid-in-glass thermometers have a long history of use in a variety of laboratory and industrial applications. Although these thermometers provide excellent performance, regulations on the sale of mercury thermometers limit their continued availability. Mercury spilled from broken thermometers also poses an environmental and safety risk.
Alternatives exist for almost all uses of mercury-filled glass thermometers. The information below gives a brief introduction on the selection and use of these alternatives.
- Alternatives to mercury-filled glass thermometers
- Ensuring good measurement results
- Differences between liquid-in-glass thermometers and electronic thermometers
- Special conditions of use
- Selection flow chart
- Frequent questions
- Learn more
Alternatives to Mercury-Filled Glass Thermometers
Resistance Temperature Detector (RTD) or Platinum Resistance Thermometer (PRT)
Currently, almost all RTDs used for accurate thermometry are made with a platinum sensor, and the term platinum resistance thermometer (PRT) generally is synonymous with RTD. The electrical resistance of the platinum rises as the temperature rises. The readout converts the measured resistance to indicated temperature using either a standard curve or a calibration function for the particular probe being used.
A properly chosen PRT probe and readout can be used to replace almost all mercury-filled liquid thermometers. For high-vibration applications within the temperature range -100 °C to 150 °C (-148 °F to 302 °F), PRT sensors formed from a platinum film deposited on a ceramic chip work well. For applications requiring broader temperature ranges or better uncertainty, we recommend wire-wound PRTs. In both cases, the sensor typically is mounted in a metal sheath.
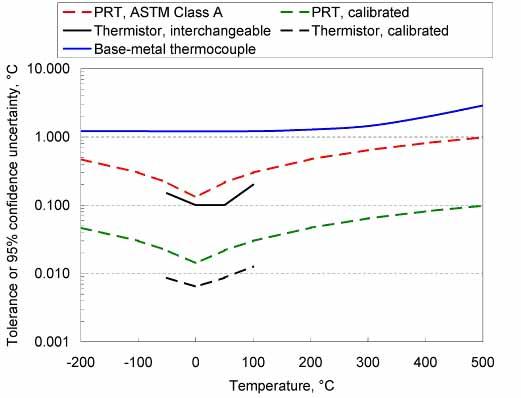
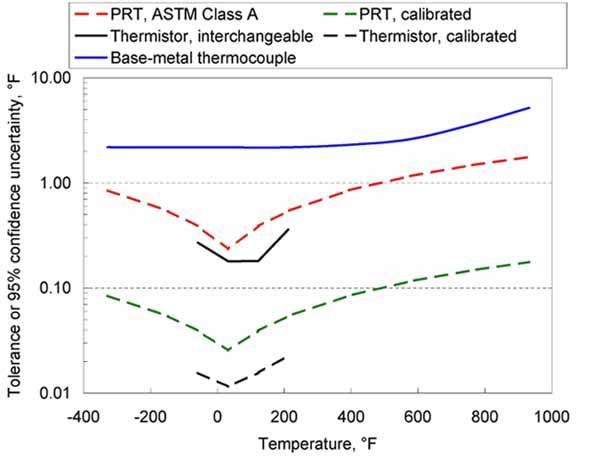
ThermistorThermistors are an excellent choice for temperature measurements in the range -20 °C to 100 °C (-4 °F to 212 °F). Thermistors used as thermometers are composed of a blend of metal oxides whose electrical resistance falls as the temperature increases. The most stable thermistors are sealed with a glass coating. For general-purpose use, the thermistor and wire leads often are mounted in a protective metal sheath. Large shocks, such as dropping the probe on the floor, could break the glass coating on the thermistor, leading to increased drift of the sensor.
ThermocoupleA thermocouple temperature sensor consists of two dissimilar metals, joined at one end to form the measuring junction. The two thermocouple wires must extend all the way from the measurement point to the readout. If intermediate connections are needed, special connectors must be used. Of all the thermometer types, thermocouples resist shock and vibration the best. The manufacturing tolerances for thermocouples are relatively large, and readouts add an additional uncertainty.
Thermocouples may be insulated with ceramic, fiberglass, or polymer insulations. The insulated thermocouple may be mounted in a metal sheath for additional protection of the sensor.
Thermocouples are a good choice when the desired uncertainty is greater than approximately 1 °C (2 °F), and a mechanically robust or compact sensor is required.
Organic-Liquid-Filled ThermometersGlass thermometers filled with non-hazardous organic liquids are a good choice when the temperature lies within the range -100 °C to +100 °C (-148 °F to 212 °F), and the desired uncertainty is 0.5 °C (»1 °F)or larger. A wide variety of organic liquids are used for commercially available thermometers. The liquid column of an organic-filled thermometer is subject to separation when the thermometer is shipped, used at extreme temperatures, or stored in a non-vertical position. When an organic-liquid-filled thermometer is subjected to these conditions, the liquid column must be carefully inspected before use.
View a table of organic-liquid-filled thermometer substitutes for mercury-containing thermometers
Chart of Typical UncertaintiesThe charts below give a summary of typical achievable uncertainties or manufacturing tolerances, in units of both degrees Celsius and degrees Fahrenheit. (These charts can assist with the selection of a thermometer, but do not represent the actual uncertainty of any particular thermometer.) With special care, better uncertainties may be obtained. On the other hand, abuse of the thermometer, long-term use, or use of inferior-quality thermometers can lead to larger uncertainties. The uncertainties on the charts include allowances for sensor drift and readout uncertainties.
Ensuring Good Measurement Results
1. Avoid shock to the sensor and readout. With metal-sheathed thermometers, damage to the sensor will not be apparent from a visual inspection or from a simple operational check.
2. For thermocouples, avoid kinks in the thermocouple wires, especially in regions where the temperature is changing from one point to another. For thermocouples used above 150 °C (302 °C), best uncertainties are obtained by using a separate thermocouple for each apparatus, and always using the thermocouple at the same depth into the apparatus.
3. Unless you are absolutely certain that two probes are interchangeable, never switch the probe used with a readout without updating calibration coefficients.
4. For readouts that support many types of probes, be absolutely certain that the readout is set to the proper thermometer type (e.g., do not read a type K thermocouple with a readout set for a type J thermocouple).
5. Do not exceed the recommended temperature limits for the probe and sensor.
6. Check the performance of the instrument regularly, following the manufacturer’s recommendations or past history for the device.
Differences Between Liquid-in-Glass Thermometers and Electronic Thermometers
Liquid-in-glass thermometers are self contained and self powered. Glass breakage often indicates mechanical abuse!
In general, electronic thermometers cost more than mercury-filled thermometers of comparable accuracy. Readouts for electronic thermometers are easy to read, and easy to integrate into an automated data system. These advantages can reduce reading errors and operational costs for electronic thermometers relative to liquid-in-glass thermometers. Damage to the sensor for an electronic thermometer often is not visually apparent.
Both types of thermometers require regular validation or recalibration.
Special Conditions of Use
In some standards applications, liquid-in-glass thermometers may be used in a manner that is highly reproducible, but that does not indicate true temperature. Switching to an alternative in these cases can alter a measurement bias in an unpredictable way.
Examples of this effect include:
1. The original liquid-in-glass thermometer was used at an incorrect immersion. Liquid-in-glass thermometers may be either partial immersion or total-immersion types. Partial immersion thermometers have a line around the circumference of the thermometer and/or a printed immersion depth on the back (e.g., 76 MM for 76 millimeters immersion). Thermometers with no indicated depth are the total immersion type. When a partial-immersion thermometer is used, the bottom of the thermometer up to the immersion line should be exposed to the temperature being measured, with the remainder of the thermometer exposed to ambient conditions. When a total immersion thermometer is used, the bulb and the entire portion of the stem containing liquid, except for the last 1 cm, are exposed to the temperature being measured. If the thermometer is not used in this manner, the thermometer immersion is incorrect. In practice, incorrect immersion is not a significant problem if the measured temperature is within 20 °C (36 °F) of ambient temperature.
2. The liquid-in-glass thermometer was used for a test where the temperature is not stabilized before a reading.
3. The body being measured has a temperature that is not uniform.
If any of these conditions hold, the reading of a liquid-in-glass thermometer may not correspond to the reading of an alternative thermometer, even if both thermometers are perfectly accurate. We recommend, first, that the alternative thermometer be carefully specified in construction. Second, the readings of a calibrated liquid-in-glass thermometer under these conditions of use should be compared with the readings of a calibrated alternative sensor to identify any measurement bias.
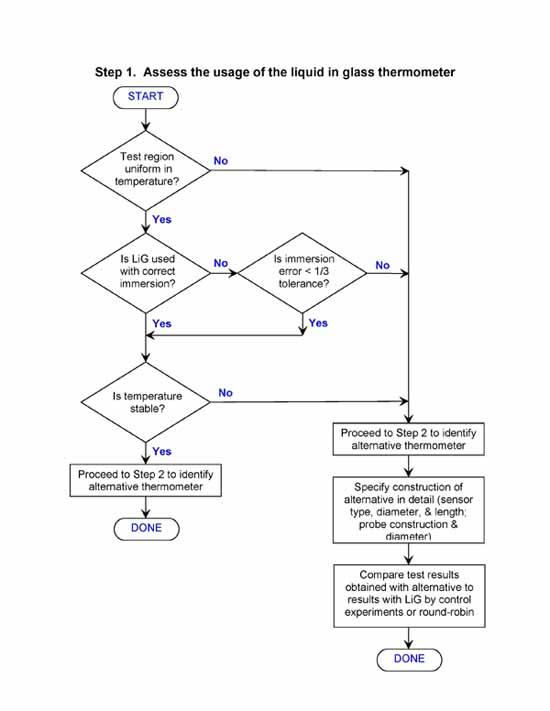
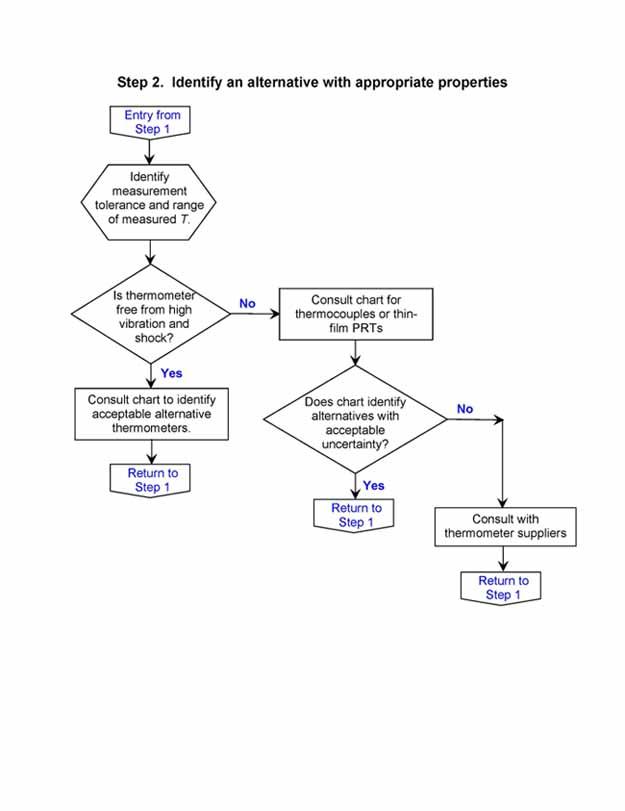
Selection Flow Chart
The selection process described in this document also can be described by a flow chart. Begin with Step 1, and enter Step 2 at the indicated point.
Frequent Questions
How much does an electronic thermometer cost?Price varies with performance. A digital readout with a thermistor or PRT sensor will cost approximately $200 for a tolerance of ±0.2 °C (±0.4 °F). Thermometers with higher or lower accuracy are available at proportionately higher or lower costs.
Do I need to have my thermometer calibrated? How often?There is no general rule stating whether thermometers require calibration. Thermometers may require calibration because:
- regulations demand calibration or demonstrated traceability to national standards
- thermometer manufacturing tolerances are too large to give the desired accuracy
- the potential risk or cost of trusting an uncalibrated thermometer (which may give the wrong answer) is too high.
See the documents on Maintaining Traceability {Insert hyperlink to WA_4-14_Task 3 Maintaining Traceability.doc} to NIST for a discussion of how often to calibrate a thermometer.
What is the difference between accuracy, tolerance, and uncertainty?“Accuracy” is a common term, but it is not well defined. In its most common usage, “accuracy” is the manufacturer’s guarantee that the instrument will give the correct answer to within the stated accuracy. In this sense, the word “accuracy” is equivalent to a manufacturing tolerance. A tolerance is the allowed variation in some property of the thermometer sensor, as shown below.
Sensors manufactured to meet a tolerance will be interchangeable to within that tolerance, at least when the sensor is new. Remember that thermometers may drift with use. How long a thermometer will meet the manufacturer’s accuracy statement depends on the thermometer type and its use!
In the field of metrology, the possible error of a measurement is given as the “measurement uncertainty”. The language of uncertainty expresses results in terms of probability. A calibration report might say that at a temperature of 100 °C, a thermometer gave a reading of 99.3 °C with an expanded uncertainty (k = 2) of 0.4 °C. This language is approximately equivalent to saying:
At a temperature of 100 °C, we obtained a reading of 99.3 °C on your thermometer. There is a 95 % likelihood that at a true temperature of 100 °C, your thermometer would read between 98.9 °C and 99.7 °C.
Those temperature limits are calculated by adding or subtracting the uncertainty from the measured value: 98.9 °C = 99.3 °C – 0.4 °C, or 99.7 °C = 99.3 °C + 0.4 °C. Different values of k (called the coverage factor) correspond to different levels of likelihood, or confidence.
Learn More
National Institute of Standards and Technology Mercury Thermometer Alternatives website
General references include:
1. J. Nicholas and D. R. White, Traceable Temperatures (Wiley, 2001).
2. Handbook of Temperature Measurement (Vols 1-3), ed. Robin E. Bentley (Springer, 1998).
An additional reference for thermocouples is:
3. ASTM Manual on the Use of Thermocouples in Temperature Measurement, MNL-12 (ASTM, West Conshohocken, PA, 1993).
A discussion of particular issues for replacing liquid-in-glass thermometers for standards work is found in:
4. Dean C. Ripple and Gregory F. Strouse, “Selection of Alternatives to Liquid-in-Glass Thermometers,” J. ASTM International 2, JAI13404 (2005).
Traceability
Overview
The word “traceability” when used in the context of measurement, including temperature measurement, is called "metrological traceability." Metrological traceability refers to how a thermometer’s measurement can be related to stated references, usually national or international standards, through an unbroken chain of comparisons all having stated uncertainties. When we use the word “traceability” in this paper, we will always mean “metrological traceability.”
The National Institute of Standards and Technology maintains national standards for temperature. In other countries, similar laboratories perform the same function.
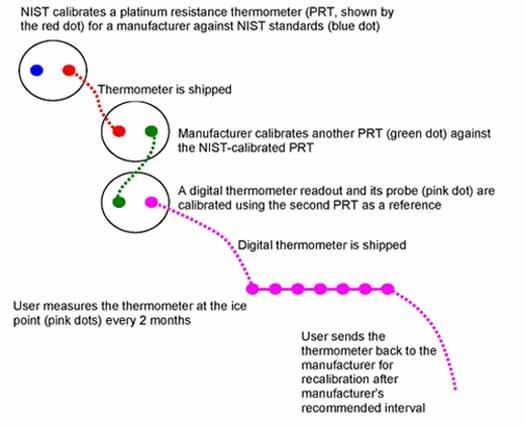
The readings of a thermometer can be compared to a known temperature standard through the process called “calibration.” Once a thermometer is calibrated, it can serve as a standard at a lower level of accuracy to calibrate another thermometer. This process can be continued, providing an unbroken chain of measurements from the final thermometer all the way back to the NIST standards.
When we compare one thermometer to another, the measurement has a probable error. Sources of error could include how well we can read the thermometer, how close the two thermometers are maintained in temperature, and the repeatability of each thermometer. The measurement uncertainty gives a measure of the probable magnitude of all of the combined sources of error.
The final measurement will have traceability to NIST standards if the following conditions are met:
- An unbroken chain of measurements back to NIST standards must be maintained.
- Each step of the chain must have known and documented uncertainties.
- There must be a system to ensure that the thermometers and other equipment used remain accurate between calibrations.
Example
The figure below shows a typical traceability path. With proper care, a thermometer can be used through many recalibration cycles beyond what is shown in the figure.
How to Ensure That a Thermometer Remains Accurate
Some thermometers are quite fragile. Unfortunately, there are often no visible signs of damage, especially for electronic thermometers! The only way to determine for certain if a thermometer’s calibration results are still valid is to check its performance.
Here are some methods that can be used to verify the performance of a thermometer. For all of the methods, an allowable tolerance for drift or variability of the thermometer should be established. In regulated applications, the tolerance of the thermometer may be specified; otherwise, the user can choose a tolerance based on his or her judgment on the required accuracy. Thermometers that give results outside the allowed tolerance should be recalibrated or taken out of service.
- Periodically have the thermometer recalibrated. If recalibration indicates that the thermometer has drifted by a magnitude that is larger than an allowable tolerance, there are several options available. Improved handling of the thermometer may reduce the drift; a thermometer with better stability can be used; or the interval between calibrations can be shortened.
- Check the readings of the thermometer at the ice or steam point. The NIST Thermometry Group can provide simple procedures for preparing an ice or steam point.
- Compare the reading of a thermometer to another, recently calibrated thermometer.
Frequent Questions
1. Who has responsibility for ensuring that a measurement is traceable?
Ultimately, the user bears the responsibility of evaluating the traceability chain. NIST does not monitor claims of traceability. There are several items that users can look for as evidence of traceability:
- Calibration methods and procedures should be openly documented.
- Uncertainties of calibration should be clearly stated.
- Traceability records should not be claimed to be private or proprietary knowledge.
- Laboratory accreditation is not a guarantee of traceability, but accreditation does provide assurance that qualified assessors have looked at a laboratory’s traceability procedures.
2. I have purchased a calibrated thermometer. How often must I have it recalibrated to maintain traceability?
Initial calibration intervals should be based on manufacturer’s recommendations or past experience with a type of thermometer. Calibration intervals may be adjusted based on the historical calibration results of a particular thermometer. If check measurements indicate significant drift, then recalibrate. If check measurements indicate large and sudden drift, remove the thermometer from service. See the section on Learning More for additional information.
3. Can I do any of the calibrations myself?
You can perform the calibrations yourself if you meet all of the requirements for maintaining traceability and have the necessary laboratory equipment and skills. Users can perform in-house performance checks, such as checks in an ice-point bath. To be sure that you are performing in-house checks correctly, we recommend that users try out their performance checks on newly calibrated instruments that are known to be accurate.
4. My thermometer is traceable to the national standards of another country. Is that equivalent to traceability to NIST?
In some cases, legal or regulatory requirements will explicitly require traceability to NIST standards. If there are no requirements of this type, then the standards of other countries likely are equivalent. Many countries, including the United States, have signed a Mutual Recognition Arrangement that recognizes the validity of each others’ calibration certificates. We also compare thermometers among nations to be sure that our standards are equivalent. View records of the recognized calibration capabilities and of comparison results Exit.
5. I have a “certified” thermometer that claims to be traceable to NIST. What is the difference between a “certified” and a “calibrated” thermometer?
There is no official definition of “certified.” Often, a certified thermometer has been tested against standards traceable to NIST, but the user is given less information on the certificate than is typical for a calibration report. To be sure that the thermometer is truly traceable to NIST, we suggest asking the vendor if the certification followed a documented process, what was the measurement uncertainty, and were the reference standards traceable to NIST.
Learn More
NIST provides a description of traceability and an extensive list of questions and answers on traceability Exit. This site is the source for official NIST policy on traceability.
The book Traceable Temperatures by J. Nicholas and D. R. White (Wiley, 2001) gives a good discussion of traceability for thermometer calibrations.
Learn more about modern uncertainty analysis.
To learn more about methods to set calibration intervals: “Guidelines for the determination of calibration intervals of measuring instruments,” ILAC-G24 (International Laboratory Accreditation Cooperation, 2007) (PDF)(11 pp, 217 K, About PDF)
